Surgeon Training
Resources for Patient Selection & Application
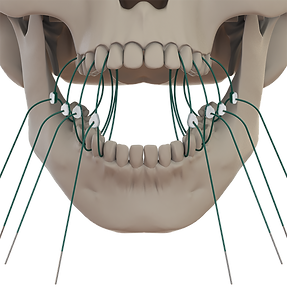
QUICK TIPS

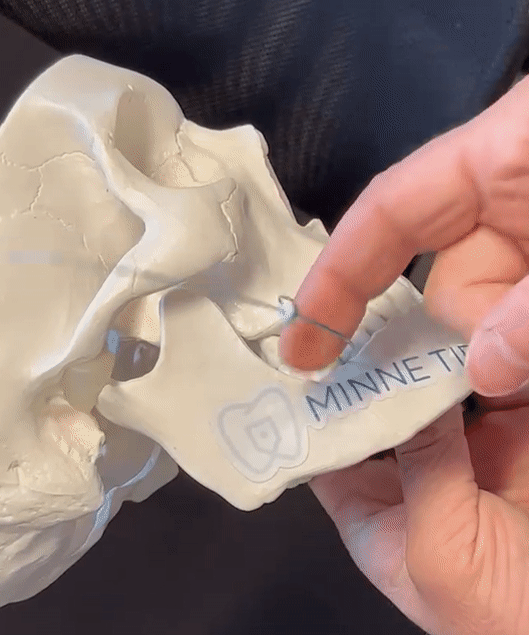
Use the Largest Size (Green) Possible
Use the largest size Minne Ties whenever possible, which minimizes the chance of "flossing out" (i.e. the Ties can pull through the contact point). Only drop down to the thinner size if the largest size won't fit in the embrasure. In this image, the circled Minne Tie would have ideally been the larger size.

Use of a Minimum of 2-3 Ties Per Side Placed in Molars and Premolars
Minne Ties are designed to work as a system, and it's important to spread the forces across the jaw. Use a minimum of four 1.0mm/18 ga sutures to obtain MMF. For short-term (up to 3 weeks) stable fixation, it is recommended to use a minimum of six 1.0mm/18 ga sutures placed in molars/premolars with tight Inter-proximal contacts
Pull Through Gingival Tissue to Seat Tie at Dental Contact (The Contact Points Should Hold the Tie; Not the Soft Tissue)
If the tissue is pierced during insertion, be sure to pull the suture through the soft tissue by using a rocking motion (see image). This ensures the Minne Ties are fully seated at the contact points which is necessary to hold the fixation (not the soft tissue).

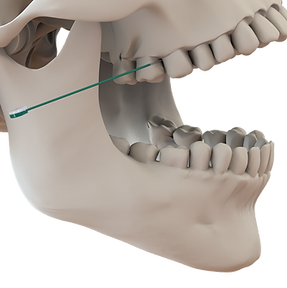
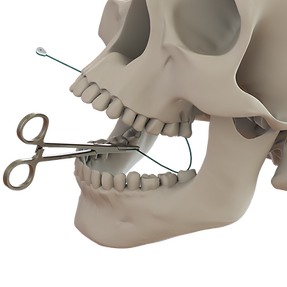
Simultaneously Pull Outward on the Tail of the Suture and Push the Clasp Head Down In One Fluid Motion
Use your gloved hand to pull on the suture while simultaneously pushing the clasp down against the teeth. This method avoids damaging the suture's coating (as opposed to using a needle driver to pull the suture).
Keep in mind that Minne Ties are made of polyester suture, not wire, so a gentle, straight tightening approach ensures the suture isn't damaged during the tightening process.
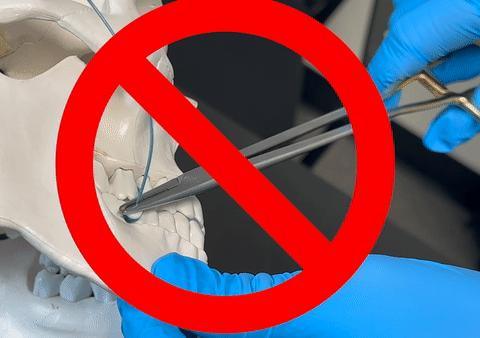
Do Not "Twist" The Suture With a Needle Driver to Tighten
When All Minne Ties are Tightened as Described, Pull Down on the Chin to Assess MMF Strength/Stability. Do Not "Over Tighten".
Unlike wire, it isn't necessary to "pull the stretch out" of Minne Ties. Compared to wire, Minne Ties have virtually no stretch. Once tightened, Minne Ties are fully secured (as long as all slack was pulled out of the lingual side).
Avoid twisting the suture using a needle driver, hemostat, or any other surgical instrument. Twisting can compromise the integrity of the suture material and may lead to breakage or insufficient tightening. Additionally, avoid gripping the introducer with a needle driver where it attaches to the suture, which may deform this area and cause the introducer to detach. Do not squeeze, pinch, or crush the clasp head from the sides with a needle driver or other instrument, as this can deform or damage the clasp.
Just like learning to twist wire and finding the breaking point, it is necessary to learn how much to tighten Minne Ties to achieve strong MMF. To check if all of the Ties are sufficiently tight, pull down on the mandible/chin to see if there is any movement. Only continue to gently tighten the Ties if there's movement. This technique assesses the strength of the Minne Ties system, rather than the strength of each individual Tie. This avoids over tightening, which can damage the suture or unnecessarily cause it to floss out.
Training Videos
Animated Tutorial Video (2:04)

Clinical Demonstration
Standard Application Tips

-
Make a plan – assess embrasure alignment
-
Always try the 1.0 mm size first. If it will not fit use the .7 mm size
-
Begin posteriorly, moving anteriorly as you place ties
-
Insert introducer into the maxillary embrasure, from buccal to lingual
-
Insert introducer back out of the mandibular embrasure from lingual to buccal
-
Place the introducer into the green side of the clasp head
-
Pull on the suture to tighten, not on the metal introducer

-
Tighten again to remove any remaining slack by holding the clasp against the teeth with a pickle fork or by pressing down gently with gloved hand, while pulling straight out on the suture. Do not pull across or parallel to the clasp, and do not squeeze the clasp on the sides with a needle driver as this can deform or damage the clasp
-
Leave the tie loose until all sutures have been placed
-
Apply 2-4 per side, using adjacent embrasures when possible
-
Tighten all sutures 'finger tight'. Double check occlusion

-
Make sure Ties are fully seated at the contact points (pulled through any tissue)
-
Use suture scissors or scalpel to cut the tail of the suture
-
Cut suture to remove in the OR, ED, or clinic

Initial Patient Selection
-
Full Dentition
-
Tight Inter-proximal Contacts
-
Simple Procedures
Alternative Application Techniques

Bridle Wire
Mandible fractures can be stabilized prior to plating by applying a Minne Tie circumdentally around 2-3 adjacent teeth, straddling the fracture, in conjunction with Minne Ties sequentially applied arch to arch. Construct stability is achieved through use of Minne Ties as a system. This Minne Ties technique is comparable to applying a bridle wire for fracture stabilization.

Shared Embrasure
Two Minne Ties can share an embrasure. Best practice is to form a "triangle" by applying Minne Ties in two separate embrasures on the maxilla or mandible and by sharing one embrasure on the opposite site.

Figure Eight
It may be beneficial to place Minne Ties in a figure 8 formation. This can be done by inserting the introducer into the maxillary embrasure and leaving a half inch tail at the clasp end to secure during the last step. Loop horizontally and exit the lingual embrasure, then cross diagonally to reinsert into the mandible buccal embrasure. Loop horizontally again and insert the introducer into the clasp head.
Additional Resources
Technique Guide
This guide will provide additional details on the correct application of Minne Ties
